Mrs Minotaur 2: stage-by-stage photos.
This is a series of photos I took as the painting 'Mrs Minotaur 2' developed. I was inspired by the prospect of so much foliage to try a slightly different method of building up this painting (compared to previous work) in that I spent a lot of time putting in the shading first - before any colour.
Here are some step-by-step photos of other paintings:
'Dinner for Two'
'The Tattooed Fairy'
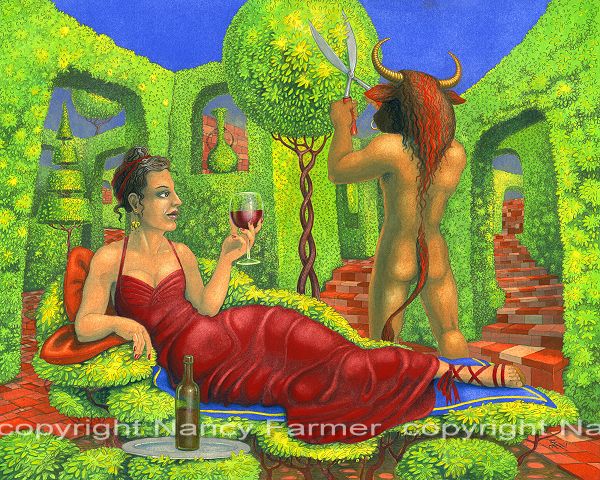
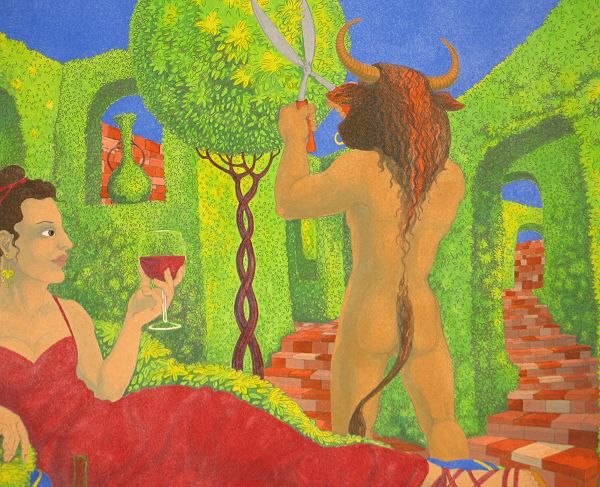
First of all here is the finished image, which can also be seen in the gallery here.

Preparing the paper:
The photo above shows the drawing on a sheet of stretched watercolor paper - this means the paper has been soaked in water so that it expands, and then taped to a board with gummed paper tape (the brown lick-and-stick stuff - though you wouldn't want to have to lick this much of it...). As the paper drys then, it can't shrink as long as it is held fast by the gummed tape so once dry it is held under tension and won't buckle when I get it wet again as I paint on it. Because, at a later stage, I'm going to get the painting very wet, I have also covered the gummed tape (once dry) with waterproof parcel tape (the wide brown shiny sort of tape). Sorry you can't see either of these - what you can just see around the edges is masking tape to give the painting a nice square edge (I have lots of sorts of tape...).
The paper is, as usual, hot-pressed watercolour paper.
The drawing:
The drawing has first been traced onto the paper, then worked over with, in this case, a lot of detail. I've found, when drawing foliage, that the best way to make it look like you've drawn every leaf... is to draw every leaf... works every time! Often I don't intend the pencil to really show much in the finished piece - but this time I do want it to show as that's partly what I'm defining all the leaves with, so I've done a very detailed drawing and been fairly heavy on the pencil, too - by comparison have a look at the more minimal drawing I did for the Tattooed Fairy picture. As ever, I've used propelling pencils (mostly 0.3 and 0.5) - I have no paitence with pencils that keep having to be sharpened and don't produce a narrow enough line, but that's just because I'm fussy like that.
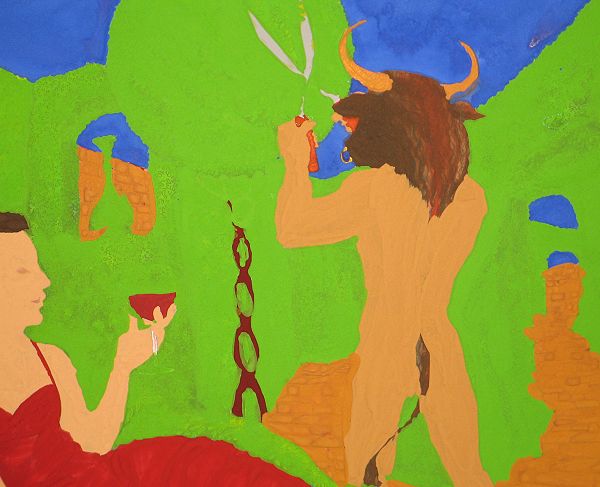
Shading in Prussian blue
All the paint is done in Gouache (a water-based paint similar to watercolour but more opaque). Because I tend to do a lot of washing excess layers of paint off again - as you'll see later - I favour pigments that stain the paper and leave a coloured layer. Not all the paints behave like this and the only way to find how a particular pigment behaves is to test it out.
What's unusual here (for me) is that I've put in all the shading first. What is not unusual is that I'm using a colour called Prussian Blue - which I'm personally very fond of and use all the time - it's quite translucent, and very deep blue - almost oily in appearence when used heavily - and most importantly it sticks like nothing else to the paper and the stain doesn't wash off easily
Yellow highlights
I thought I could add some highlights in too - before adding the real colour, so I've put these in in a yellow paint (again, it has to be one that's good at staining the paper). This putting in highlightls first isn't actually as effective as putting in the shading first (I've since found with other paintings) because of the slightly unpredictable way the yellow blocks the final colour - but it worked quite well in this case.
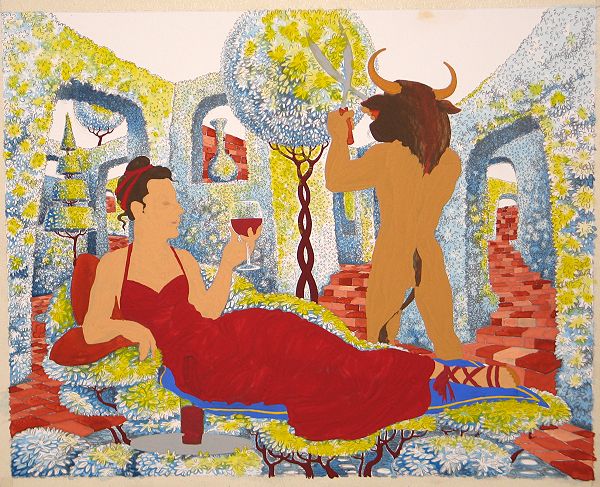
The final 'colouring-in'
Finally, with the reds and flesh tones etc. I have started adding the 'real' colours. Again, I'm using paints that I know will stain the paper and not easily be washed off. These go on straight over the prussian blue shading.

And, clearly at this stage it looks like I can't paint (again!). This is partly because you can't see any of the shading, but also because I'm using under-layers of paint to resist subsequent layers. For instance, in the previous photograph I have very carefully painted each brick in a different reddish shade, but left a gap between each, especially in the foreground. Now in this photo I've painted a brown colour over the whole lot - this brown colour will effectively go between the cracks in the bricks - the only exposed area of paper left here with no paint on it. When I wash off the excess paint the brown will hardly be picked up by any of the paper that already had bricks painted on it - tying the whole thing together with the same brown 'mortar'.
This is just a close-up to show the detail of the (aparentyl) awfull mess! I'm relying here on the fact that a heavyish coating of paint will protect the paper from subsequent layers - like a resist effect. Some colour will bleed through other layers of paint - especially the stronger pigments - and only trial and error has shown me how much I can get away with this cavalier attitude of splodging on the last layers of paint.
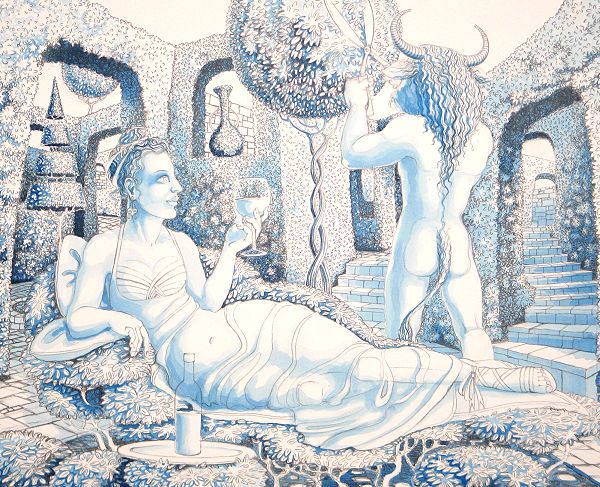
Instant picture !
This bit is like magic. I take the picture up-stairs and stand it up in the (empty) bath, and hold the shower over it while I sweep accross the surface with a soft mop-like brush - the excess paint washes off, leaving what is only a little more than stained paper, and the original pencil drawing visible again beneath it all. As if by magic the picture apears. Of course it only does this because I've spent many many hours carefully drawing and staining the paper in the right places, but it's still a great moment when it works properly. Once all the excess paint is off, the surface can be blotted with kitchen paper and dried with a hairdryer so it doesn't stand around wringing wet for to long.
There are unpredictable elements to this tequnique, and from this point the painting still needs a lot of work to bring up the colours, highlights and shadows. Mrs Minataur's dress in particular will need a lot of work after this stage, but I was particuarly pleased with the way the light and shade worked on the steps to the right, and there are areas like this that I will leave almost untouched in the finishing stages.
This is the whole picture, at the same stage as the previous image, after washing. From this point I will create highlights by selectively scrubbing off some more of the paint, this time with a more abrasive bristle brush, but because the painting is already quite bright and doesn't have the murky wash that I put on top of a lot of my paintings this part of the process won't have the striking effect that it usualy does and is more subtle. Have a look at the later images of the Tattooed Fairy picture for this process.
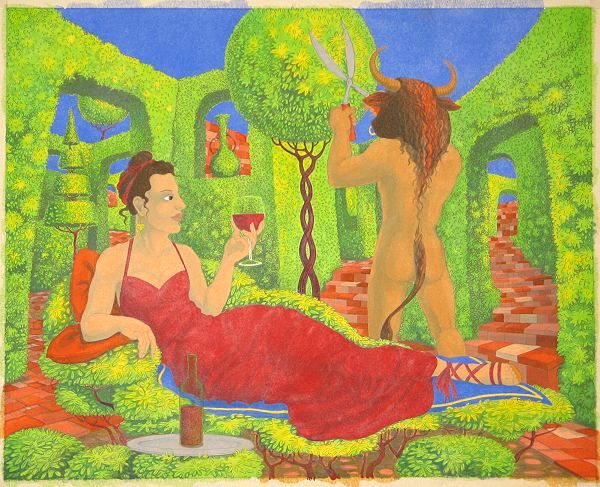
Final details
This shows the final painting - I've worked up the details of the painting, strengthening the 'washed' base of the painting by adding highlights, shadows and stronger colour. This is actually a scanned image (the previous images are photographs) so it's hard to show the exact degree to which the painting has changed as the scanner produces a better image anyway, but I hope it might give you an idea of the way this picture came to life.